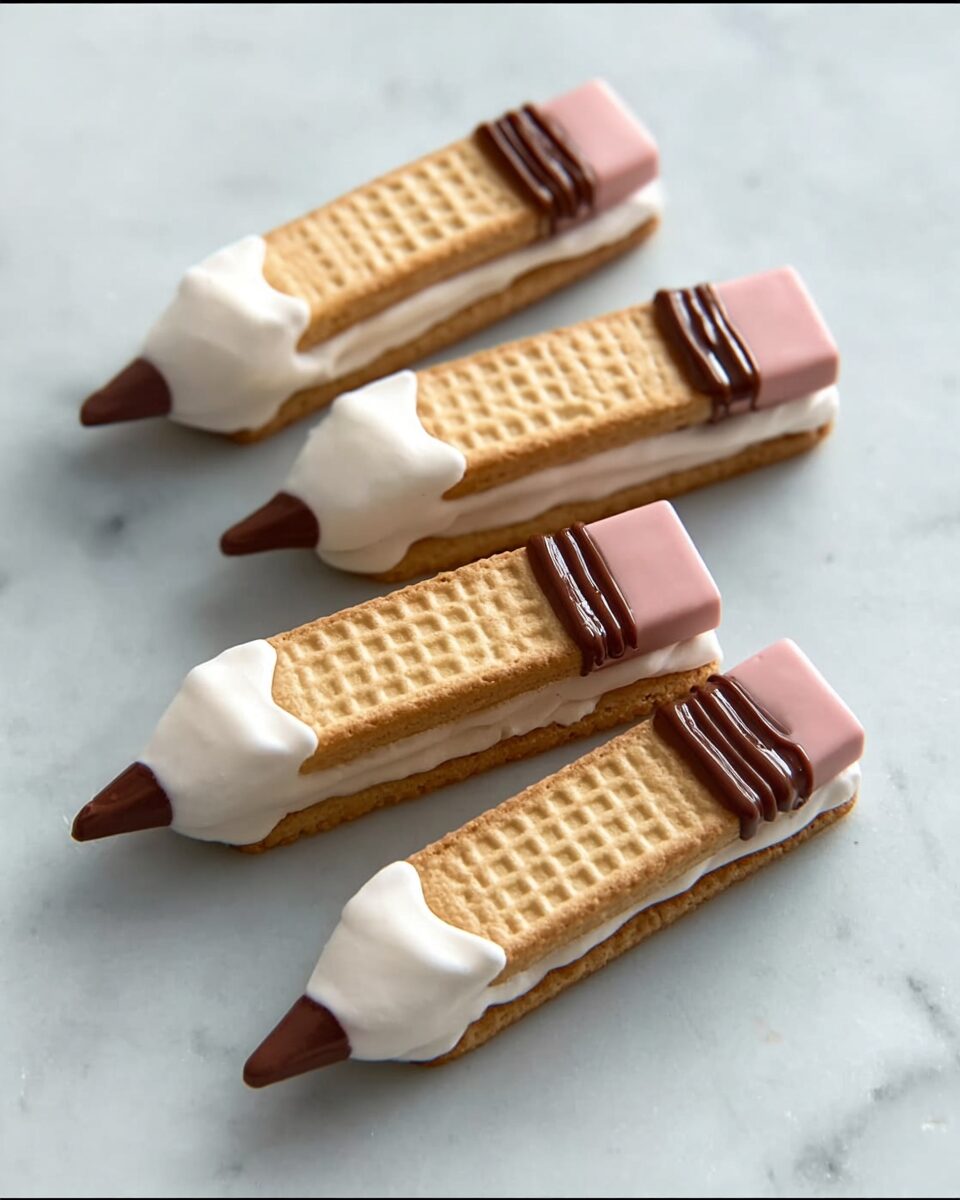
These adorable Wafer Pencil Cookies are a playful and tasty way to celebrate the start of the school year. Made with crunchy vanilla wafers, colorful chocolate melts, and a mini chocolate chip tip, each cookie mimics a pencil so perfectly you’ll do a double-take. They’re fun to make and even more fun to eat—kids won’t believe they can snack on their pencils! Perfect for lunchbox surprises, back-to-school parties, or even as classroom favors, these sweet treats are as photogenic as they are delicious. Plus, with no baking required, it’s a stress-free project that kids can help with. Personalize them by piping names or fun phrases and get creative with cookie colors. School has never been so tasty!
Full recipe:
Ingredients:
-
Vanilla wafer cookies (such as Voortman brand)
-
Bright white chocolate melting wafers
-
Light pink chocolate melting wafers
-
Mini chocolate chips
-
#5 piping tip and piping bag
Directions:
-
Using a small knife, cut one end of each wafer cookie into a point by trimming both top corners diagonally to form a triangle tip.
-
Melt the pink chocolate wafers according to the package directions. Fill a piping bag fitted with a #5 piping tip.
-
Pipe pink chocolate onto the flat bottom end of each wafer to resemble an eraser. Shake gently to smooth out the surface.
-
Melt the white chocolate wafers as per package instructions and fill a new piping bag.
-
Pipe white chocolate into the triangular tip area of the wafer cookie to form the pencil’s sharpened wood section. Shake again to smooth.
-
While the white chocolate is still soft, press a mini chocolate chip onto the point to resemble the pencil’s lead.
-
Let cookies sit at room temperature or refrigerate briefly to set.
Prep Time: 15 minutes | Cooking Time: 0 minutes | Total Time: 15 minutes
Kcal: 110 kcal (approx. per cookie) | Servings: 12 cookies
The Cutest Back-to-School Treat: Wafer Pencil Cookies
Back-to-school season is a time of new beginnings, fresh notebooks, sharpened pencils—and the perfect opportunity to celebrate with something sweet. These Wafer Pencil Cookies aren’t just cute, they’re also incredibly easy to make and guaranteed to bring a smile to anyone’s face. Whether you’re sending your kids off to their first day of class, planning a classroom celebration, or simply want to make snack time special, these adorable cookies are a fun, tasty, and creative choice.
Inspired by the nostalgic joy of new school supplies, Wafer Pencil Cookies look just like pencils but are completely edible. They’re made with vanilla wafer cookies, colored melting chocolates, and a single mini chocolate chip to represent the pencil lead. With just a few simple steps and no oven required, this recipe is one of the best snackable crafts you can make with or for kids.
Where the Idea Came From
The idea for pencil-shaped cookies has been circulating among creative parents and Pinterest boards for a few years, often tied to school-themed events, teacher appreciation days, or back-to-school parties. But this simplified version using store-bought vanilla wafer cookies brings that creative concept into every kitchen—no advanced baking skills needed.
What sets this recipe apart is its smart use of ready-made ingredients. Instead of baking from scratch, which can be time-consuming or intimidating for beginners, Wafer Pencil Cookies use items that are easy to find and assemble. This makes the project accessible to parents, teachers, or kids of nearly any age.
Why This Recipe Is a Favorite Among Parents and Teachers
Wafer Pencil Cookies check off all the right boxes for busy parents and creative educators. They’re:
-
Quick to prepare: No baking time, no oven use—just melt, pipe, and decorate.
-
Kid-friendly: Kids can help with piping, assembling, and eating, making it a great bonding activity.
-
Cost-effective: With only four main ingredients, this treat won’t break the bank.
-
Visually delightful: Their charming pencil look makes them ideal for themed parties, lunchbox surprises, or even party favors.
-
Customizable: Switch up chocolate colors or add names and phrases to personalize each treat.
These factors make Wafer Pencil Cookies not just a fun project, but also a practical one that works across different settings and occasions.
The Ingredients: Simple Yet Magical
The beauty of this recipe is in its simplicity. Each component plays a specific visual role:
-
Vanilla Wafer Cookies: These serve as the base or body of the pencil, providing a light, crisp texture and mild sweetness that pairs well with chocolate.
-
Light Pink Melting Wafers: Used to create the eraser at the end of the pencil.
-
Bright White Chocolate Melting Wafers: Piped into a triangular shape to mimic the sharpened wood of a pencil.
-
Mini Chocolate Chips: One chip pressed into the tip instantly becomes the pencil “lead”—the final touch that brings the illusion to life.
You can find these ingredients at most grocery or baking supply stores, and they come in many varieties and brands. Feel free to choose high-quality melting chocolates for richer flavor or go with candy melts that come in vibrant colors for fun variations.
Creative Variations for Different Occasions
While the classic version is perfect for back-to-school, this recipe is also versatile enough to fit other celebrations:
-
Teacher Appreciation Week: Add personalized messages using edible marker or icing pens.
-
Graduation Parties: Pipe graduation year numbers or small caps using royal icing.
-
Birthday Parties for School-Loving Kids: Create a dessert tray filled with edible school supplies.
-
Holiday-Themed Pencils: Switch pink and white chocolates with red and green for Christmas, or orange and black for Halloween pencils.
Another fun twist is letting kids design their own pencils with a small cookie-decorating station—think of it as edible arts and crafts!
Tips for Perfect Results Every Time
Even though Wafer Pencil Cookies are beginner-friendly, a few extra tips can help make your cookies picture-perfect:
-
Cutting the Wafer Tips: Use a sharp serrated knife for cleaner cuts and to prevent crumbling. Slice slowly and evenly from both corners.
-
Smoothing the Chocolate: After piping the pink or white chocolate, tap the cookie lightly on a flat surface to help the chocolate settle into a smooth finish.
-
Melting Chocolate in Small Batches: Since melted chocolate can harden quickly, consider melting one color at a time and piping all cookies with that color before moving on to the next.
-
Piping Bags and Tips: A #5 piping tip is ideal for small details. You can also use a sandwich bag with the corner snipped as a quick alternative.
-
Cooling Time: Let the cookies set at room temperature or refrigerate briefly to speed up the process.
Making It a Family Activity
One of the best aspects of this recipe is that it turns snack-making into a shared experience. Invite your kids into the kitchen to participate—cutting may be an adult task, but kids will love dipping, piping, and pressing chocolate chips into the tips. This not only makes them feel accomplished but also gives them something to look forward to eating.
It’s also a great way to teach kids about shapes, coordination, and following steps in a recipe. Whether you’re a parent looking for an engaging rainy day project or a teacher planning a hands-on classroom activity, Wafer Pencil Cookies deliver on fun and function.
Storage and Gifting Tips
Wafer Pencil Cookies store surprisingly well and make excellent edible gifts:
-
Storage: Keep them in an airtight container at room temperature for up to 5 days. If you’re in a humid climate, storing them in the fridge can help preserve the chocolate.
-
Packaging: For gifting, wrap each cookie in a cellophane bag and tie it with a ribbon in school colors.
-
Labeling: Use printable tags with puns like “You’re the WRITE choice!” or “You’re SHARP!” for an extra dose of charm.
These cookies also hold their shape well during travel, so they’re safe to transport to school, daycare, or a friend’s house.
Nutritional Perspective
While this isn’t exactly a “health food,” Wafer Pencil Cookies can be considered a smarter dessert choice in moderation. Each cookie is relatively small and contains fewer calories than frosted cupcakes or traditional sugar cookies. If you’d like to make them even more mindful:
-
Use sugar-free or reduced-sugar wafer cookies
-
Opt for dark chocolate melts for a slightly healthier twist
-
Limit portion sizes by serving on mini dessert trays
Of course, the best benefit here is joy—these cookies will definitely light up little faces and bring a sense of fun to food.
Why Wafer Pencil Cookies Stand Out
Among all the back-to-school snacks out there, Wafer Pencil Cookies remain a favorite for good reason. They combine creativity, flavor, and convenience in one neat little treat. Unlike complex baked goods that require multiple bowls and steps, these cookies are low-fuss and high-impact.
They also strike a sweet balance between novelty and nostalgia. While the design is new and whimsical, the flavors (vanilla wafer + chocolate) evoke a classic, comforting taste that appeals to kids and adults alike. This makes them not just a gimmick, but a genuinely delicious option.
Conclusion
Wafer Pencil Cookies aren’t just a dessert—they’re a fun experience, a creative expression, and a delightful way to bring joy to the classroom, home, or any educational setting. With only a few ingredients and minimal prep time, you can whip up a batch of cookies that look impressive and taste even better. Whether you’re a busy parent, a classroom teacher, or just someone who loves themed treats, this recipe is a winning choice.
Get ready to impress the kids (and adults!) in your life with these charming edible pencils—they’re sweet, simple, and totally unforgettable.


